UbuntuにPHP7.2をインストールする
UbuntuにPHP7.2とPHP FPMをインストールして、nginxに接続するまでの手順をまとめました。
動作環境
- Windows 10 pro [Windows 10 October Update (Version 1809) ]
- Windows Subsystem for Linux
- Ubuntu 18.04.2 LTS (Bionic Beaver)
- nginx
PHPのインストール
パッケージリストの更新とアップグレードを行います
[root@hostname /]$
apt-get -y update
[root@hostname /]$
apt-get -y upgrade
PHP7.2をインストールします
[root@hostname /]$
apt-get -y install php7.2 php7.2-mysql php7.2-mbstring php7.2-zip
バージョンを確認します
[root@hostname /]$
php -v
PHP 7.2.15-0ubuntu0.18.04.1 (cli) (built: Feb  8 2019 14:54:22) ( NTS )
Copyright (c) 1997-2018 The PHP Group
Zend Engine v3.2.0, Copyright (c) 1998-2018 Zend Technologies
    with Zend OPcache v7.2.15-0ubuntu0.18.04.1, Copyright (c) 1999-2018, by Zend Technologies
php.iniの設定
/etc/php/7.2/cli/php.iniの[DATE]セクションの「date.timezone」を「Asia/Tokyo」に設定する
[DATE]
; Defines the default timezone used by the date functions
; http://php.net/date.timezone
;date.timezone =
date.timezone = "Asia/Tokyo"
PHP FPMのインストール
FPMとは
FPM(FastCGI Process Manager)は高負荷サイトに対応したPHPのFastCGIである
FastCGIとは
Webサーバー上でプログラムを動作させるためのインターフェース仕様の一つ。
CGIは、リクエストの度にプロセスの生成と破棄が行われる。
リクエストが増えれば、その分だけ生成と破棄が実行され、そのことがパフォーマンスの悪化に繋がっている。この問題点を解決するため、プロセスをメモリ上に保持し続けることによって、プロセスの生成・破棄にかかる時間を削減し、プログラムの動作速度の向上とサーバーの負荷を軽減した仕様である。
インストール
[root@hostname /]$
apt-get -y install php7.2-fpm
php.iniの設定
/etc/php/7.2/fpm/php.iniの[DATE]セクションの「date.timezone」を「Asia/Tokyo」に設定する
[DATE]
; Defines the default timezone used by the date functions
; http://php.net/date.timezone
;date.timezone =
date.timezone = "Asia/Tokyo"
www.confの設定
/etc/php/7.2/fpm/pool.d/www.confの[www]セクション内の以下の項目を設定する
実行ユーザーと所有者を「www-data」ユーザーから「nginx」ユーザーに変更する
user = www-data
group = www-data
listen.owner = www-data
listen.group = www-data
user = nginx
group = nginx
listen.owner = nginx
listen.group = nginx
スクリプトをその他の拡張子で実行されないよう制限する
「security.limit_extensions」のコメントを外してhtmlの拡張子を追加する
;security.limit_extensions = .php .php3 .php4 .php5 .php7
security.limit_extensions = .php .html
「php7.2-fpm.sock」のパーミッションを変更します
[root@hostname /]$
chmod 666 /var/run/php/php7.2-fpm.sock
nginxでPHPを動かす
PHP FPMの設定
「/etc/nginx/sites-available/default」にPHP FPMの設定を追記する
最初に、バックアップを取っておきます
[root@hostname /]$
cp -p /etc/nginx/sites-available/default /etc/nginx/sites-available/default.org
indexディレクティブに「index.php」を追加する
# Add index.php to the list if you are using PHP
index index.php index.html index.htm index.nginx-debian.html;
locationディレクティブにURIのパスの設定を追加する
 # pass PHP scripts to FastCGI server
 #
 #location ~ \.php$ {
 #       include snippets/fastcgi-php.conf;
 #
 #       # With php-fpm (or other unix sockets):
 #       fastcgi_pass unix:/var/run/php/php7.0-fpm.sock;
 #       # With php-cgi (or other tcp sockets):
 #       fastcgi_pass 127.0.0.1:9000;
 #}
コメントを削除して必要項目を追加します
 # pass PHP scripts to FastCGI server
 #
location ~ [^/]\.php(/|$) {
        fastcgi_split_path_info ^(.+?\.php)(/.*)$;
        if (!-f $document_root$fastcgi_script_name) {
           return 404;
        }
        # With php-fpm (or other unix sockets):
        fastcgi_pass unix:/var/run/php/php7.2-fpm.sock;
        fastcgi_index index.php;
        include fastcgi_params;
        fastcgi_param SCRIPT_FILENAME $document_root$fastcgi_script_name;
        fastcgi_param PATH_INFO $fastcgi_path_info;
        fastcgi_param PATH_TRANSLATED $document_root$fastcgi_path_info;

}
fastcgi_split_path_infoディレクティブ
PATH_INFOとSCRIPT_FILENAMEを区別するための正規表現を設定します
パラメータには、「$fastcgi_script_name」と「$fastcgi_path_info」用の2つの正規表現のキャプチャ(「()」のこと)が必要です
fastcgi_passディレクティブ
FastCGIサーバーに処理を渡すポートを設定します
PHPの場合は、TCPソケット通信(127.0.0.1:9000)、unixソケット通信(unix:/var/run/php/php-fpm.sock)などがあります
fastcgi_indexディレクティブ
URIの末尾が「/」の場合にindexディレクティブに設定されたファイル名を付与します
「$fastcgi_script_name」の値に設定されます
fastcgi_paramディレクティブ
FastCGIサーバーに渡すパラメータを設定します。パラメータには、テキスト、変数を組み合わせて設定できます。渡されたパラメータをkey=valueの形式で設定するため、2つのパラメータを記載する必要があります
serviceの起動
[root@hostname /]$
service php7.2-fpm start
[root@hostname /]$
service nginx restart
* Restarting nginx nginx                                                                 [ OK ]
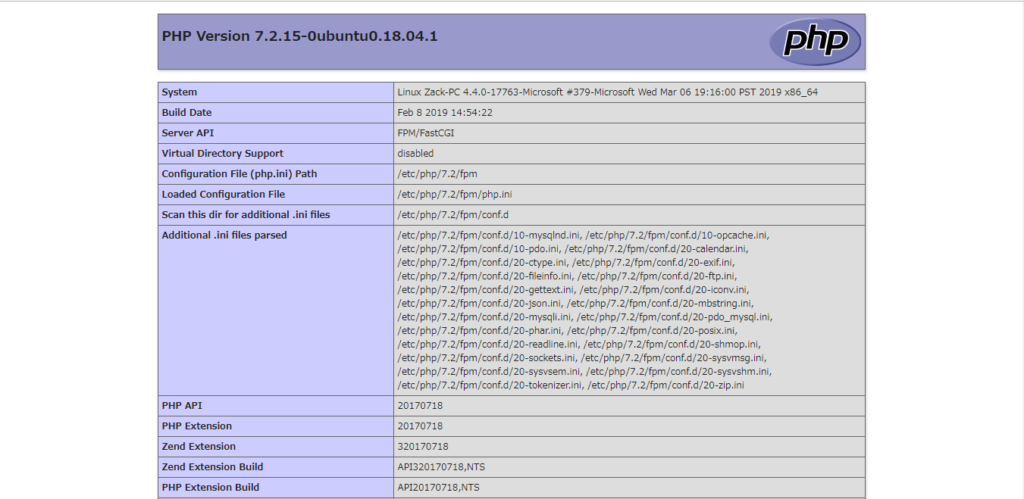
index.phpにphpinfo()を記述して実行確認します。